Creative Decorating Ideas for Home & Events
The Ultimate Guide to Creative Decorating: Transform Your Home & Events with Style
Estimated reading time: 23 minutes
Key Takeaways
- Personalize Your Space: Decorating is an art form and personal expression. Utilize elements like unique **bathroom wall decor**, vibrant **dining room wall decor**, and thoughtful **mantel decor** to reflect your individual style and enhance daily living.
- Celebrate with Flair: Transform special moments and holidays with themed decorations. From whimsical **Grinch Christmas decorations** and creative **pumpkin decorating ideas** to charming **baby shower decorations** and personalized **graduation cap decoration**, make every event memorable.
- Master DIY Techniques: Embrace practical skills like how to **paint wall with stencils** for personalized patterns, and draw inspiration from timeless aesthetics like **Martha Stewart-style yellow kitchen decor** for a welcoming atmosphere.
- Source Smart & Build Your Toolkit: Understand the versatility and durability of materials like **Floor & Decor tile** and know where to find quality resources at various **Floor & Decor locations**. Embrace the “Decora DTI” spirit of maximalism and DIY.
- Apply Decorating Principles: Utilize color theory, strategic lighting, and budget-friendly tips. Remember that decorating is an active, ongoing process (decoro and decorarán) that evolves with your personal story, prioritizing comfort and functionality over fleeting trends.
Table of Contents
- Introduction: Unleash Your Inner Decorator – A Journey to Beautiful Spaces
- Section 1: The Art of Home Transformation – Elevating Everyday Living
- 1.1 Elevating Your Bathroom Wall Decor: From Functional to Fabulous
- 1.2 Designing Dynamic Dining Room Wall Decor: Setting the Scene for Gatherings
- 1.3 Mastering Mantel Decor: The Heart of the Living Space
- 1.4 Transforming Walls with Stencils: Personalized Patterns and Artistic Flair
- 1.5 Inspired by Martha Stewart: Crafting Martha Stewart Yellow Kitchen Decor
- Section 2: Celebrating Seasons & Special Moments – Decor for Life’s Milestones
- Section 3: Materials, Resources & DIY Inspiration – Building Your Decorating Toolkit
- Section 4: General Decorating Principles & Tips – Foundations for Any Project
- Conclusion: Your World, Beautifully Decorated
- Frequently Asked Questions (FAQs) About Creative Decorating
Introduction: Unleash Your Inner Decorator – A Journey to Beautiful Spaces
Ready to transform your home and celebrate special moments with style? Dive into our comprehensive guide for easy, creative, and inspiring decorating ideas that promise to elevate every corner of your life.
Decorating is more than just arranging objects; it’s an art form, a personal expression, and a powerful way to shape the atmosphere of your home and celebrate life’s most cherished moments. Whether you’re looking to refresh a tired room, host an unforgettable event, or simply infuse your surroundings with more personality, the world of decor offers endless possibilities. From the subtle elegance of a well-placed accent to the vibrant spectacle of holiday themes, every decorative choice tells a story.
In this ultimate guide, we invite you to discover easy and creative ideas for home and event decorating. We’ll explore everything from the intimate details of bathroom wall decor and the grandeur of dining room wall decor to the festive flair of baby shower decorations and the whimsical charm of Grinch Christmas decorations. Get ready to get inspired by classic styles like Martha Stewart-style yellow kitchen decor, learn practical skills like how to paint wall with stencils, and find out where to source beautiful materials at Floor & Decor locations and with their premium Floor & Decor tile selections. We’ll even delve into the personal touch of a graduation cap decoration and the delightful challenge of pumpkin decorating ideas.
Our goal is to empower you with the knowledge, inspiration, and practical tips needed to turn your decorating visions into stunning realities. So, whether you’re a seasoned decor enthusiast or just starting your creative journey, prepare to elevate your spaces, embrace your creativity, and make every corner a reflection of you.
Section 1: The Art of Home Transformation – Elevating Everyday Living
Your home is your sanctuary, a canvas waiting for your personal touch. Thoughtful decoration can transform mundane spaces into inspiring havens, reflecting your style and enhancing your daily life. Let’s explore how to revitalize key areas within your home.
1.1 Elevating Your Bathroom Wall Decor: From Functional to Fabulous
The bathroom, often overlooked, presents a unique opportunity for creative expression. Beyond utility, bathroom wall decor can turn a purely functional space into a spa-like retreat or a vibrant design statement.
1.1.1 Setting the Mood: Themes and Color Palettes
Consider the overall mood you wish to create. For a serene spa ambiance, opt for calming colors like soft blues, greens, grays, or neutrals. Complement these with natural textures such as wood, bamboo, or stone. If you prefer a bolder statement, vibrant colors or dramatic patterns can transform the space.
1.1.2 Art and Mirror Placement
- Mirrors: A statement mirror can be both functional and decorative. Choose a unique frame—geometric, ornate, or minimalist—to add architectural interest. Larger mirrors can also make a small bathroom feel more spacious.
- Artworks: Waterproof prints, canvases, or framed photographs can introduce personality. Opt for themes like abstract art, nature scenes, or typography that complement your chosen color scheme. Ensure frames are moisture-resistant.
- Gallery Walls: For larger bathrooms, a small gallery wall can be a focal point, combining different sized artworks, mirrors, and even small shelves with decorative objects.
1.1.3 Shelving and Storage as Decor
Open shelving not only provides practical storage for toiletries but also offers prime real estate for decorative items.
- Floating shelves: Display rolled towels, scented candles, small plants (like succulents or air plants that thrive in humidity), and decorative bottles.
- Niche shelving: If your bathroom has built-in niches, highlight them with accent lighting and curated decor pieces.
- Woven baskets: Ideal for storing extra towels or toilet paper, they also add a touch of texture and warmth.
1.1.4 Unique Wall Treatments
Beyond paint, consider:
- Wallpaper: A bold floral, geometric, or even textured wallpaper can instantly elevate the bathroom. Ensure it’s suitable for high-humidity environments.
- Wainscoting or Paneling: Adds a classic, sophisticated touch. Paint it in a contrasting color or a crisp white for a timeless look.
- Tile Accent Walls: Create a feature wall behind the vanity or in the shower with unique Floor & Decor tile patterns or colors.
1.2 Designing Dynamic Dining Room Wall Decor: Setting the Scene for Gatherings
The dining room is where memories are made over shared meals. Its walls play a crucial role in defining the room’s character and enhancing the dining experience. Dining room wall decor should foster conversation and provide a visually pleasing backdrop.
1.2.1 The Power of Art: Focal Points and Collections
- Large-Scale Art: A single, oversized piece of art can serve as a dramatic focal point, drawing the eye and setting the aesthetic tone for the entire room.
- Gallery Walls: A curated collection of framed prints, photographs, or mirrors can tell a story. Vary frame sizes and styles for an eclectic look, or keep them consistent for a more formal feel. Consider themes that evoke warmth, food, or conversation.
- Tapestries or Macrame: Add texture and a bohemian or global flair with fabric wall hangings.
1.2.2 Mirrors for Light and Space
Strategically placed mirrors can bounce light around the room, making it feel brighter and more spacious. An ornate mirror can add a touch of vintage elegance, while a modern, frameless design can enhance a contemporary aesthetic. Position it to reflect a window or a beautiful chandelier for added impact.
1.2.3 Architectural Elements and Built-ins
- Wainscoting or Paneling: As in bathrooms, wainscoting can add classic charm.
- Molding and Trim: Decorative molding can frame a wall, creating an architectural interest even without additional art.
- Built-in Shelving or Cabinets: These offer practical storage for dishware and glassware while providing display opportunities for decorative plates, vases, or cookbooks.
1.2.4 Wall Coverings Beyond Paint
- Wallpaper: A metallic, textured, or patterned wallpaper can add depth and luxury. Choose a pattern that complements your dining table and chairs.
- Murals: For a truly unique statement, consider a hand-painted mural or a custom wall decal depicting a landscape, abstract design, or trompe l’oeil effect.
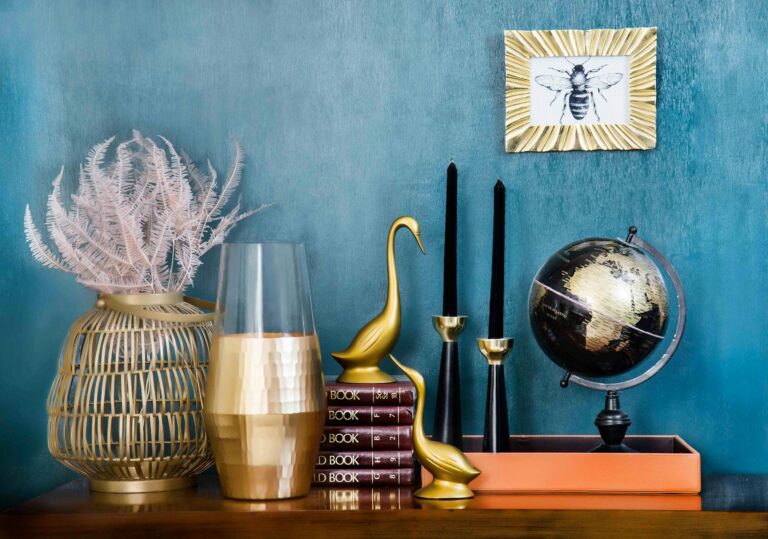
1.3 Mastering Mantel Decor: The Heart of the Living Space
The fireplace mantel is often the natural focal point of a living room, offering a prime stage for seasonal displays and personal touches. Mantel decor should be balanced, intentional, and reflective of your style.
1.3.1 The Anchor Piece: Art, Mirror, or TV
Start with a central anchor piece. This could be a large piece of artwork, a beautifully framed mirror, or even a subtly mounted television. This element sets the scale for everything else.
1.3.2 The Rule of Three (and other odd numbers)
When arranging smaller objects, groupings of three or five tend to be more visually appealing. Vary heights, textures, and shapes within these groupings.
1.3.3 Balance and Symmetry vs. Asymmetry
- Symmetrical: For a formal, traditional look, place identical items on either side of the anchor piece (e.g., matching lamps, candlesticks, or vases).
- Asymmetrical: For a more relaxed, contemporary feel, use objects of different sizes and shapes, ensuring the visual weight is balanced on both sides. For instance, a tall vase on one side might be balanced by a stack of books and a smaller sculpture on the other.
1.3.4 Layering and Depth
Create interest by layering objects. Place a smaller frame in front of a larger one, or lean a small piece of art against the wall in front of your anchor. Use books or pedestals to add varying heights.
1.3.5 Incorporating Greenery and Light
- Plants and Flowers: Vases of fresh flowers, potted succulents, or trailing ivy can add life and color.
- Candles and Lighting: Candlesticks, pillar candles, or small lamps provide ambient lighting and warmth, especially in the evenings.
1.3.6 Seasonal Touches
The mantel is perfect for seasonal transitions. Think gourds and autumn leaves for fall, festive garlands and ornaments for Christmas, or fresh spring blooms.
1.4 Transforming Walls with Stencils: Personalized Patterns and Artistic Flair
Paint wall with stencils is a fantastic DIY method to add intricate patterns, textures, and unique designs to your walls without the commitment or cost of wallpaper. It offers immense creative freedom and can transform a plain wall into a work of art.
1.4.1 Choosing Your Stencil Design
- Pattern Stencils: From geometric shapes and damask patterns to floral motifs and intricate mandalas, pattern stencils can create an all-over wallpaper effect.
- Accent Stencils: Smaller stencils featuring specific designs (e.g., animal silhouettes, inspirational quotes, botanical elements) can be used to create a focal point or border.
- Faux Finishes: Stencils can mimic the look of bricks, wood grain, or textured plaster.
1.4.2 Essential Tools and Materials
- Stencil: High-quality stencils (mylar or vinyl are common).
- Paint: Latex paint (acrylics for detailed work) in your chosen color(s).
- Applicator: Stencil brushes, foam rollers (for larger areas), or sponge applicators.
- Painter’s Tape: Low-tack tape to secure the stencil.
- Spray Adhesive (optional): Repositionable adhesive for a tighter bond and sharper lines.
- Paper Towels: To offload excess paint.
- Level: To ensure straight application.
1.4.3 Step-by-Step Stenciling Process
- Prepare the Wall: Ensure the wall is clean, dry, and smooth. Apply a base coat of your desired color if necessary.
- Plan Your Layout: Decide where to start (often the ceiling line or a corner) and mark your guidelines with a pencil and level to ensure even spacing.
- Secure the Stencil: Use painter’s tape or spray adhesive to firmly attach the stencil to the wall. Ensure there are no gaps for paint to bleed underneath.
- Apply Paint:
- Stencil Brush: Dip the brush lightly into paint, then offload excess onto a paper towel. Use a dabbing or stippling motion (not brushing) to apply thin, even coats.
- Foam Roller: Roll off excess paint significantly. Use light pressure and multiple thin coats to prevent bleeding.
- Remove the Stencil: Carefully peel off the stencil while the paint is still slightly wet. If the paint dries completely, it might peel off with the stencil.
- Repeat: Align the stencil with previously painted areas (most stencils have registration marks) and continue the process until the wall is complete. Clean your stencil regularly if paint starts to build up.
- Touch-ups: Use a small artist’s brush for any minor touch-ups.
1.4.4 Tips for Success
- Less is More: Use very little paint at a time to avoid bleeding. Multiple thin coats are better than one thick coat.
- Practice First: If you’re new to stenciling, practice on a piece of cardboard or scrap material.
- Cleanliness: Keep your stencil and brushes clean to maintain sharp lines.
1.5 Inspired by Martha Stewart: Crafting Martha Stewart Yellow Kitchen Decor
The name Martha Stewart evokes a sense of timeless elegance, practicality, and exquisite taste. Martha Stewart yellow kitchen decor is synonymous with cheerfulness, warmth, and a welcoming atmosphere, often blending traditional charm with sophisticated simplicity.
1.5.1 The Power of Yellow: Choosing Your Shade
Martha Stewart’s approach to yellow is often nuanced. It’s rarely a harsh, primary yellow, but rather a softer, more inviting hue:
- Buttery Yellows: Creamy, pale yellows that feel gentle and classic.
- Golden Yellows: Richer, deeper yellows that add warmth and a touch of sophistication.
- Lemon Yellows (Sparingly): Brighter yellows can be used for accents to add a pop of energy.
1.5.2 Classic Elements of Martha’s Kitchen Style
- Cabinetry: Often white, off-white, or a light cream, providing a clean backdrop. Sometimes, cabinets might be painted a soft yellow or a complementary pastel.
- Countertops: Natural materials like marble, granite, or wood. White subway tile backsplashes are also a hallmark.
- Flooring: Hardwood floors, classic checkerboard tile, or natural stone.
- Natural Light: Maximizing natural light is key. Sheer curtains or simple window treatments allow sunshine to flood the space.
1.5.3 Integrating Yellow Through Decor
- Walls: A soft yellow paint color on the walls can envelop the room in warmth.
- Textiles: Incorporate yellow through dish towels, tablecloths, seat cushions, or window treatments. Patterns often feature subtle checks, stripes, or small florals.
- Ceramics and Serveware: Display yellow ceramic bowls, platters, or pitchers. Martha’s style often emphasizes practical, beautiful items that are used daily.
- Fresh Produce: A bowl of lemons or a vase of sunflowers immediately brings in natural yellow hues.
- Accessories: Small touches like a yellow clock, canister set, or vintage yellow kitchen appliances can tie the theme together.
1.5.4 Complementary Colors
Yellow pairs beautifully with:
- White: For a crisp, clean, and airy feel.
- Blues: Especially robin’s egg blue or soft sky blue, creating a classic cottage or French country aesthetic.
- Greens: Sage green or pale olive can add an organic, refreshing touch.
- Neutrals: Beige, cream, and grey provide a sophisticated anchor.
1.5.5 Practical Elegance
Martha Stewart’s philosophy is about beautiful living that is also practical. Ensure your yellow kitchen decor is not just pretty but also functional and inviting. Think about accessible storage, comfortable seating, and durable, easy-to-clean surfaces.
Section 2: Celebrating Seasons & Special Moments – Decor for Life’s Milestones
Life is punctuated by celebrations, holidays, and special events. Decorating for these occasions adds joy, creates atmosphere, and makes memories even more vivid. Let’s explore how to bring festive flair to various celebrations.
2.1 Festive Entrances: Mastering Christmas Door Decorations
The front door is the welcoming gateway to your home, and never is it more important than during the festive season. Christmas door decorations set the tone for holiday cheer and invite guests into a warm, celebratory space. Abby Lawson, from “Just a Girl and Her Blog,” offers excellent advice on hanging outdoor Christmas garland, which can be seamlessly integrated into your door decor.
2.1.1 The Classic Wreath
A Christmas wreath is timeless.
- Traditional: Evergreen wreaths adorned with red bows, pinecones, and berries.
- Modern: Minimalist hoops with sparse greenery, oversized ornaments, or unique materials like faux fur.
- DIY: Create your own with unconventional materials like fabric scraps, old ornaments, or even dried citrus slices.
2.1.2 Garlands and Swags: Framing Your Entryway
Garlands beautifully frame the door, creating a grand entrance.
- Abby Lawson’s Tips for Hanging Garland:
- Measure Carefully: Measure the perimeter of your door frame (sides and top) and add extra for draping or fullness.
- Secure Attachment Points: Use temporary outdoor hooks (like command hooks), brick clips, or sturdy nails/screws if you have a wooden frame. Place hooks every 1-2 feet for even support.
- Start at the Top Center: Hang the garland’s center first, then work outwards, ensuring even draping on both sides.
- Layer for Fullness: If your garland isn’t as full as you’d like, consider layering a second strand or weaving in additional picks and sprays.
- Add Lights and Ornaments: Weave in battery-operated LED lights or plug-in lights (ensure they are outdoor rated). Add shatterproof ornaments, bows, or faux berries for extra sparkle.
- Swags: Smaller, pre-made arrangements can be hung vertically on the door or horizontally above the door.
2.1.3 Lighting Up the Night
- Fairy Lights: String lights around the door frame, within the garland, or even on the wreath.
- Lanterns: Place battery-operated lanterns on either side of the door or hanging from hooks for a warm glow.
2.1.4 Beyond the Door: Porch Decor
Extend the festive feel to your porch with:
- Potted Plants: Mini evergreens, poinsettias, or decorative branches in festive planters.
- Door Mats: A holiday-themed door mat adds a welcoming touch.
- Sleighs or Vintage Props: Incorporate larger decorative elements if space allows.
2.2 Embrace the Whimsy: Grinch Christmas Decorations
For those who love a dash of mischief and a deviation from traditional red and green, Grinch Christmas decorations offer a playful and wonderfully whimsical alternative. This theme is all about embracing the quirky charm of Dr. Seuss’s classic character and bringing Whoville to life.
2.2.1 The Grinch Color Palette
While green is central, incorporate:
- Bright Reds: For Max’s scarf or Santa’s suit.
- Whites and Silvers: For snow and sparkle.
- Pinks and Teals: From Whoville’s whimsical aesthetic, used sparingly for pops of fun.
2.2.2 Grinchy Accents and Figures
- The Grinch Himself: Large cutouts, inflatable Grinches, or smaller figurines placed strategically (peeking from trees, holding stolen ornaments).
- Max the Dog: Include Max, the loyal sidekick, often depicted with an antler.
- Whoville Elements: Recreate the quirky, spiraling trees and irregular shapes found in Whoville.
2.2.3 Twisted and Topsy-Turvy Decor
The Grinch theme thrives on imperfection and playful disruption:
- “Stolen” Presents: Create piles of slightly askew or “stolen” gift boxes near the fireplace or under the tree.
- Bent Ornaments: Hang ornaments that look like they’ve been pulled off, or intentionally bend candy canes into Grinchy shapes.
- Upside-Down Tree: For the ultimate Grinch statement, consider an upside-down Christmas tree, symbolizing the Grinch’s attempt to steal Christmas.
- Grinch-Inspired Garland: Weave green garland with red and white striped ribbons, oversized red ornaments, and perhaps some Grinch-green mesh.
2.2.4 “Whoville” Style and Details
- Irregular Shapes: Incorporate spirals, zigzags, and whimsical curves into your decor.
- Bright Lights: Use colorful string lights, perhaps even oversized ones, to mimic the cartoon’s vibrant feel.
- Grinch-isms: Display signs with quotes like “Maybe Christmas, perhaps, means a little bit more” or “He took the Who-hash, the roast beast!”
- DIY Whoville Trees: Create small, whimsical trees using green feather boas, felt, or even green tinsel, topped with a star or a Grinch hand.
2.2.5 Table Settings and Food
Extend the theme to your holiday table with green and red tableware, Grinch-themed treats (like green sugar cookies with a heart), and playful centerpieces.
2.3 Spooky & Sweet: Creative Pumpkin Decorating Ideas
Beyond carving, pumpkin decorating ideas offer a wide array of creative possibilities for Halloween and the fall season. From elegant to whimsical, pumpkins are versatile canvases.
2.3.1 No-Carve Wonders: Safety and Longevity
No-carve methods are safer, less messy, and allow your pumpkins to last much longer, making them ideal for earlier-season decorating.
2.3.2 Elegant & Sophisticated Pumpkins
- Painted Pumpkins:
- Metallic: Gold, silver, or rose gold spray paint creates a chic, glamorous look.
- Matte Neutrals: White, black, grey, or blush pink for a minimalist aesthetic.
- Ombre: Blend two or more colors for a gradient effect.
- Geometric Patterns: Use painter’s tape to create stripes, chevrons, or abstract designs.
- Glitter Pumpkins: Apply glue in sections and sprinkle with fine or chunky glitter for sparkle.
- Lace or Stencil Patterns: Use lace fabric or stencils to create intricate designs with paint or spray adhesive.
- Decoupage: Attach tissue paper, fabric scraps, or pressed leaves using Mod Podge.
2.3.3 Whimsical & Fun Pumpkins
- Character Pumpkins: Paint pumpkins to resemble beloved characters (e.g., superheroes, animals, pop culture icons).
- Googly Eyes: Attach various sizes of googly eyes for a silly, spooky effect.
- Yarn-Wrapped: Wrap pumpkins in colorful yarn for a textured, cozy look.
- Fingerprint Art: A fun activity for kids, using paint to create patterns with fingerprints.
2.3.4 Natural & Rustic Pumpkins
- Leaves and Twigs: Glue autumn leaves, small twigs, or dried flowers onto pumpkins.
- Burlap and Twine: Wrap pumpkins in burlap ribbons or twine for a rustic farm-inspired look.
- Pinecones and Acorns: Hot glue natural elements found in your yard.
2.3.5 Functional Decor
- Vases: Hollow out a pumpkin and use it as a temporary vase for fall flowers.
- Candle Holders: Place small LED candles inside for a safe, glowing effect.
2.4 Joyful Beginnings: Charming Baby Shower Decorations
Celebrating the impending arrival of a new baby is a joyous occasion that calls for delightful baby shower decorations. The key is to create a warm, inviting, and celebratory atmosphere that reflects the parents’ style and the anticipation of the little one.
2.4.1 Themes and Color Schemes
- Classic Baby Themes: “Twinkle Twinkle Little Star,” “Oh Boy/Girl,” “Welcome to the World,” “Noah’s Ark.”
- Modern Neutral: Greys, whites, creams, and pastels for a sophisticated look.
- Whimsical: Hot air balloons, forest animals, enchanted gardens.
- Storybook: Based on a favorite children’s book.
- Colors: Traditional pinks and blues, or gender-neutral options like mint green, yellow, lavender, or a mix of soft pastels.
2.4.2 Balloon Displays
Balloons are quintessential baby shower decor.
- Balloon Arches/Garlands: Create stunning focal points above dessert tables or entryways.
- Letter Balloons: Spell out “BABY,” the baby’s name, or “OH BOY/GIRL.”
- Confetti Balloons: Filled with themed confetti for extra sparkle.
2.4.3 Banners and Backdrops
- Personalized Banners: With the baby’s name or a sweet message.
- Photo Booth Backdrops: Use floral walls, streamers, or themed backdrops for memorable photos.
- DIY: Create banners using cardstock, felt, or fabric.
2.4.4 Table Decor and Centerpieces
- Floral Arrangements: Soft, delicate flowers in small vases.
- Diaper Cakes: Both decorative and practical, a multi-tiered “cake” made of rolled diapers.
- Baby-Themed Props: Small baby shoes, bottles, blocks, or stuffed animals as part of the centerpiece.
- Candies and Treats: Color-coordinated candies or baked goods arranged decoratively.
2.4.5 Thoughtful Touches
- Welcome Sign: A personalized sign to greet guests.
- Favors: Small, themed favors for guests, often tied in with the decor.
- Advice Cards: Provide cards for guests to write advice for the parents-to-be, creating a beautiful keepsake.
- Clothesline Display: Hang baby clothes on a miniature clothesline for a charming visual.
2.5 A Cap for Success: Creative Graduation Cap Decoration
The graduation cap is more than just a piece of academic regalia; it’s a blank canvas for personal expression and a vibrant celebration of achievement. Graduation cap decoration allows graduates to tell their unique story, thank loved ones, or simply showcase their personality as they cross the stage.
2.5.1 Planning Your Design
- Theme: What do you want to convey? Your major, future career, hobbies, favorite quote, or gratitude?
- Visibility: Remember that the cap will be viewed from a distance, so bold designs and clear lettering are often best.
- School Rules: Check if your institution has any rules regarding cap decoration (e.g., no offensive language, certain materials).
2.5.2 Popular Decoration Techniques
- Paint: Acrylic paints are excellent for detailed designs and vibrant colors. Use stencils for neat lettering or freehand for artistic flair.
- Glitter: Adds sparkle and catches the light. Apply glue and sprinkle glitter liberally.
- Fabric/Felt: Cut out shapes, letters, or images from fabric or felt and glue them onto the cap.
- Paper Cutouts/Cardstock: Create multi-layered designs or intricate patterns.
- 3D Elements:
- Flowers: Faux flowers, paper flowers, or even small real flowers (lightweight).
- Miniature Objects: Small replicas related to your major (e.g., tiny books, art supplies, medical symbols).
- Ribbons and Bows: Add texture and color.
- Rhinestones/Pearls: For a touch of glamour and sparkle.
- Photographs: Print small photos of family, friends, or memorable moments and attach them.
2.5.3 Common Themes and Messages
- Gratitude: “Thank you, Mom & Dad,” “Gracias Familia.”
- Future Aspirations: “Future Doctor,” “Next Stop: [University/City/Job].”
- Quotes: Inspirational quotes, movie lines, or song lyrics.
- Major-Specific: Elements related to your field of study.
- School Spirit: Incorporating school colors or mascots.
2.5.4 Tips for a Flawless Cap
- Measure and Sketch: Measure the cap and sketch your design on paper first.
- Protect the Cap: Cover the button and tassel hole with tape if you don’t want them painted or glued.
- Strong Adhesive: Use a strong craft glue (like E6000 or hot glue) for durability.
- Layering: Build up your design in layers, letting each layer dry before adding the next.
- Sealant: Consider using a clear spray sealant to protect your design from smudges and moisture.
Section 3: Materials, Resources & DIY Inspiration – Building Your Decorating Toolkit
Beyond individual ideas, successful decorating often comes down to the right materials, access to resources, and a willingness to embrace DIY. This section explores essential elements for bringing your visions to life.
3.1 Sourcing Quality: Floor and Decor Tile
When it comes to home renovations and lasting decor, the quality and variety of materials are paramount. Floor & Decor tile is a cornerstone for many projects, offering a vast selection that caters to diverse styles and budgets.
3.1.1 Why Tile? Versatility and Durability
Tile is an incredibly versatile material, suitable for floors, walls, backsplashes, and even countertops. It’s known for its durability, water resistance (especially porcelain and ceramic), ease of cleaning, and long lifespan, making it an excellent investment for both aesthetic appeal and practical function.
3.1.2 Exploring Floor & Decor’s Extensive Selection
Floor & Decor is renowned for its wide array of tile options, including:
- Ceramic Tile: Affordable, versatile, and available in countless colors, patterns, and finishes. Ideal for walls and light-traffic floors.
- Porcelain Tile: More durable and water-resistant than ceramic, making it suitable for high-traffic areas, bathrooms, kitchens, and even outdoor applications. Often mimics natural stone or wood.
- Natural Stone Tile: Marble, granite, travertine, slate, and limestone offer timeless elegance and unique variations. Requires sealing and specific care.
- Glass Tile: Adds a shimmering, reflective quality, perfect for backsplashes and accent walls. Available in various colors and transparencies.
- Wood-Look Tile: Porcelain or ceramic tiles expertly crafted to replicate the appearance and texture of hardwood, without the maintenance concerns.
- Luxury Vinyl Tile (LVT): A durable, water-resistant, and cost-effective alternative that can mimic wood, stone, or ceramic.
- Mosaics: Pre-arranged small tiles on a mesh backing, ideal for intricate patterns, borders, or feature walls.
3.1.3 Choosing the Right Tile
- Consider the Space: What is the function of the room? Is it high traffic? Wet?
- Style Match: Does the tile complement your overall home aesthetic?
- Maintenance: Are you willing to commit to the specific care requirements of certain tiles (e.g., natural stone)?
- Budget: Tile options range widely in price, so set a realistic budget.
3.2 Finding Your Resources: Floor and Decor Locations
Knowing where to find a reliable source for your decorating and renovation materials is crucial. Floor & Decor locations provide a comprehensive showroom experience, offering not just tiles but also a wide range of flooring, tools, and accessories.
3.2.1 The Floor & Decor Experience
- Showroom Layout: Stores are designed to inspire, with large displays and vignettes showcasing various tile and flooring options in realistic settings. This helps visualize how materials will look in your own home.
- Expert Assistance: Knowledgeable staff are often available to guide you through product selections, answer technical questions, and help with design choices.
- In-Stock Inventory: One of Floor & Decor’s key advantages is its extensive in-stock inventory, allowing customers to purchase and take home materials immediately, reducing project delays.
- Tools and Accessories: Beyond the main materials, you can find all the necessary tools for installation, including mortar, grout, sealants, cutting tools, and more, making it a one-stop shop for your tiling needs.
3.2.2 Online vs. In-Store
While you can browse products online, visiting a physical Floor & Decor location is highly recommended for:
- Seeing Samples: Colors, textures, and finishes can look very different in person.
- Feeling the Product: Understanding the weight, thickness, and quality firsthand.
- Getting Design Inspiration: Observing how different tiles are used in real-world applications.
- Consulting with Experts: Getting personalized advice for your specific project.
3.3 The Art of Creative Expression: Decora DTI
Decora DTI can be interpreted in a few ways. “Decora” is a style of Japanese street fashion known for its colorful, layered, and often playful aesthetic. “DTI” often refers to “draw the inspiration” challenges within online art communities. When combined, it signifies a vibrant, personalized, and often DIY approach to decoration, embracing maximalism, unique combinations, and a strong sense of personal identity.
3.3.1 Embracing the “Decora” Spirit in Home Decor
Applying the spirit of Decora to home decor means:
- Maximalism and Layering: Don’t shy away from mixing patterns, colors, and textures. Layer rugs, throw blankets, and pillows.
- Vibrant Color Palettes: Use bold, unconventional color combinations. Think fuchsia with electric blue, or neon green with bright orange.
- Playful & Whimsical Elements: Incorporate quirky figurines, pop culture references, unique art pieces, and objects that spark joy.
- DIY & Personalization: Much like the fashion style, home decor inspired by Decora DTI would emphasize handmade items, customized furniture, and personal collections that tell a story.
- No Rules: Break traditional decorating rules. Mix vintage with modern, high-end with flea market finds. It’s about expressing your unique aesthetic.
3.3.2 Practical Applications for “Decora DTI” Home Decor
- Gallery Walls: An eclectic gallery wall is perfect, mixing photos, prints, mirrors, and even small objects.
- Curated Collections: Display your collections prominently – whether it’s vintage toys, unique ceramics, or travel souvenirs.
- Textile Play: Use patterned curtains, quirky upholstery, and a variety of throw pillows.
- Repurposing & Upcycling: Transform old furniture with bold paint colors or new hardware. Give new life to discarded items.
- Lighting: Use colorful lampshades, fairy lights, or unique light fixtures to add to the whimsical atmosphere.
3.4 The Act of Adorning: Decoro and Decorarán
The Spanish words decoro (I decorate, or decorum/propriety) and decorarán (they will decorate) highlight the active, intentional nature of decorating. They remind us that decorating is a process, a verb, and a reflection of both personal action and future aspirations.
3.4.1 Decoro: The Personal Act of Creation
“Decoro” embodies the personal investment in creating a beautiful space. It’s the “I” in decorating – my choices, my style, my effort.
- Personalization: Every item chosen, every color painted, every arrangement made is an act of “decoro.” It’s about infusing your personality into your surroundings.
- Mindful Decorating: It implies a thoughtful approach, considering how each element contributes to the overall feeling and function of a space.
- Ongoing Process: Decorating isn’t a one-time event; it’s an evolving journey of refinement and adaptation.
3.4.2 Decorarán: The Promise of Future Transformation
“Decorarán” points to the future, the promise of transformation. It’s the planning, the anticipation, and the collective effort.
- Planning and Vision: Before “decoro” happens, there’s the “decorarán” – the envisioning of what a space will be. This involves dreaming, sketching, and gathering inspiration.
- Collaboration: When “they will decorate,” it can imply a collaborative effort with family, friends, or even professional designers.
- Event Planning: For events like baby showers or Christmas, “decorarán” emphasizes the collective effort in preparing a festive atmosphere.
3.4.3 Integrating the Philosophy
By embracing both “decoro” and “decorarán,” we understand decorating as a dynamic process:
- Start Small: Even a simple act of arranging a mantel (decoro) can lead to a vision for a whole room (decorarán).
- Be Intentional: Every decorative choice should serve a purpose, whether aesthetic or functional.
- Enjoy the Process: The journey of transforming a space is as rewarding as the final result.
Section 4: General Decorating Principles & Tips – Foundations for Any Project
Beyond specific themes and materials, a few overarching principles can guide any decorating endeavor, ensuring cohesion, functionality, and enduring appeal.
4.1 Color Theory in Decor: Setting the Emotional Tone
Color is one of the most powerful tools in a decorator’s arsenal, capable of evoking emotions, influencing perceptions of space, and setting the overall mood of a room. Understanding basic color theory can elevate your decor choices.
4.1.1 The Color Wheel
- Primary Colors: Red, blue, yellow (cannot be created by mixing other colors).
- Secondary Colors: Green, orange, purple (created by mixing two primary colors).
- Tertiary Colors: Red-orange, blue-green, yellow-green (created by mixing a primary and a secondary color).
4.1.2 Color Relationships
- Complementary Colors: Opposites on the color wheel (e.g., blue and orange, red and green). They create high contrast and vibrancy, often used for accents.
- Analogous Colors: Three colors next to each other on the color wheel (e.g., blue, blue-green, green). They create a harmonious, serene feel.
- Monochromatic Colors: Different shades, tints, and tones of a single color. Creates a sophisticated, calm, and cohesive look.
4.1.3 Warm vs. Cool Colors
- Warm Colors (Reds, Oranges, Yellows): Evoke energy, warmth, and intimacy. They can make a large room feel cozier. Think Martha Stewart yellow kitchen decor for warmth.
- Cool Colors (Blues, Greens, Purples): Evoke calm, serenity, and spaciousness. They can make a small room feel larger.
4.1.4 The 60-30-10 Rule
A popular guideline for color distribution in a room:
- 60% Dominant Color: Walls, large furniture pieces (sofa, rug).
- 30% Secondary Color: Curtains, accent chairs, smaller furniture.
- 10% Accent Color: Pillows, decorative objects, artwork, floral arrangements.
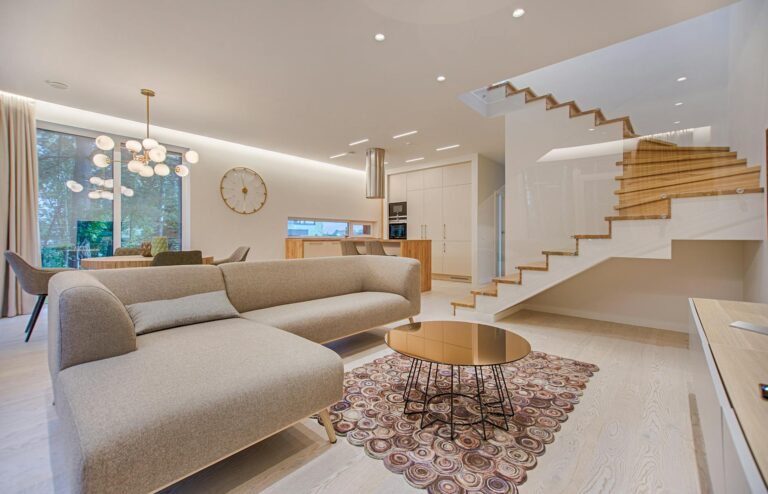
4.2 Lighting as a Decor Element: Illuminating Your Design
Lighting is not just functional; it’s a critical decorative element that can transform the ambiance, highlight features, and complete the aesthetic of any space.
4.2.1 Three Layers of Light
Effective lighting design incorporates three layers:
- Ambient Lighting (General Illumination): Provides overall light for a room. Examples: Ceiling fixtures, recessed lights, track lighting.
- Task Lighting: Provides focused light for specific activities. Examples: Desk lamps, under-cabinet lighting in kitchens, reading lamps beside a bed or armchair.
- Accent Lighting: Highlights specific objects or architectural features. Examples: Picture lights, spotlights on artwork, uplights on plants, decorative lamps on a mantel decor display.
4.2.2 Types of Fixtures as Decor
- Chandeliers: Grand, decorative centerpieces for dining rooms or entryways.
- Pendants: Versatile for kitchen islands, entryways, or grouped over tables.
- Sconces: Wall-mounted fixtures that provide ambient or accent lighting and add architectural interest. Ideal for bathrooms or hallways.
- Lamps: Table lamps and floor lamps offer flexibility in placement and style, providing soft, localized light.
- Dimmers: Essential for controlling mood and adapting light levels to different times of day or activities.
4.2.3 Considerations for Placement and Style
- Function: What activities happen in the room?
- Focal Points: Use light to draw attention to art, dining room wall decor, or architectural details.
- Mood: Warm white light creates a cozy atmosphere; cool white light is more energizing.
- Scale: Ensure light fixtures are appropriately sized for the room.
4.3 Budget-Friendly Decorating: Style Without Breaking the Bank
Achieving a beautiful home doesn’t require an unlimited budget. Smart, creative, and strategic choices can result in stunning decor that’s both stylish and affordable.
4.3.1 Prioritize and Plan
- Identify Key Pieces: Decide which items are worth investing in (e.g., a comfortable sofa, a good mattress) and where you can save.
- Create a Budget: Stick to it strictly.
4.3.2 Embrace DIY (Do-It-Yourself)
- Paint: A fresh coat of paint is one of the most transformative and cost-effective updates. Consider paint wall with stencils for a custom look.
- Upcycling Furniture: Give old furniture new life with paint, new hardware, or fabric.
- Handmade Decor: Create your own art, pillows, or small decor items. This aligns perfectly with the Decora DTI spirit.
4.3.3 Shop Smart
- Thrift Stores & Flea Markets: Hidden gems can be found at unbeatable prices. Look for unique pieces that can be upcycled.
- Sales and Clearance: Sign up for newsletters from your favorite stores (like Floor & Decor for tile sales) to be notified of discounts.
- Discount Retailers: Stores offering trendy items at lower prices.
- Online Marketplaces: Facebook Marketplace, Craigslist, and local buy/sell groups are great for second-hand finds.
4.3.4 Repurpose and Rearrange
- Shop Your Home: Before buying new, look at what you already have. Can that blanket be a wall hanging? Can those old books be mantel decor?
- Rearrange Furniture: A new layout can make a room feel completely fresh without spending a dime.
4.3.5 Focus on High-Impact Areas
Instead of trying to overhaul everything, focus on one or two areas that will make the biggest difference (e.g., a statement gallery wall in the dining room, new bathroom wall decor).
4.4 Personalizing Your Space: Beyond Trends
True decor is a reflection of you. While trends offer inspiration, personalization ensures your home feels authentic and uniquely yours.
4.4.1 Tell Your Story
- Display Memories: Photographs, travel souvenirs, heirlooms, and personal collections are invaluable.
- Showcase Hobbies: If you’re an artist, display your work. If you love music, incorporate instruments or record collections into your decor.
4.4.2 Comfort and Functionality First
A beautiful space that isn’t comfortable or functional won’t feel like home. Prioritize ease of living and choose pieces that serve a purpose in your daily life.
4.4.3 Embrace Imperfection
Your home doesn’t need to look like a showroom. The subtle imperfections and signs of life are what give a home its character and warmth.
4.4.4 Evolve with You
Your style will change over time, and your decor should evolve with you. Don’t be afraid to update, rearrange, or completely refresh your spaces as your tastes mature. Remember that the act of “decoro” is continuous.
Conclusion: Your World, Beautifully Decorated
Decorating is a journey of discovery – discovering your style, new creative ideas, and the transformative power of a well-designed space. From the intimate corners of your bathroom wall decor to the grand statements of dining room wall decor, and from the festive cheer of Grinch Christmas decorations to the personal triumph of a graduation cap decoration, every element contributes to the narrative of your life.
We’ve explored how to master mantel decor, unleash your creativity with paint wall with stencils, and find inspiration in timeless styles like Martha Stewart-style yellow kitchen decor. You’ve learned about sourcing quality materials like Floor & Decor tile from convenient Floor & Decor locations, and embraced the DIY spirit of Decora DTI. We’ve also touched on the active process of decorarán and decoro, reminding us that decorating is both an aspiration and an ongoing personal endeavor.
May this guide inspire you to look at your surroundings with fresh eyes, armed with creative ideas, practical tips, and the confidence to express your unique aesthetic. Remember, whether you’re planning baby shower decorations or conjuring charming pumpkin decorating ideas, the goal is to create spaces and moments that bring you joy, comfort, and a profound sense of belonging. So go forth, be bold, be creative, and make your world beautifully decorated.
Frequently Asked Questions (FAQs) About Creative Decorating
Q1: How do I choose a coherent theme for my home when I like many different styles?
A1: Start by identifying common threads or a dominant mood you want to evoke. You don’t have to stick to one rigid style. Instead, consider a primary style (e.g., modern, farmhouse, traditional) for 70-80% of your decor, then layer in elements from other styles you love as accents (the remaining 20-30%). For example, a modern home can have a vintage-inspired gallery wall or a few antique pieces. A cohesive color palette and similar material finishes (e.g., all warm woods, all cool metals) can also tie diverse styles together.
Q2: What’s the best way to make a small room feel larger through decor?
A2: Several tricks can visually expand a small space:
- Light Colors: Paint walls in light, cool colors or neutrals.
- Mirrors: Strategically place large mirrors to reflect light and create the illusion of depth.
- Vertical Lines: Use vertical stripes, tall curtains hung high, or vertically oriented artwork to draw the eye upwards.
- Leggy Furniture: Choose furniture with exposed legs to allow light and sightlines to flow underneath.
- Minimal Clutter: Keep the space organized and decluttered. Utilize smart, hidden storage.
- Recessed Lighting: Use recessed lights instead of bulky fixtures.
- Light-Filtering Window Treatments: Sheer curtains or blinds that allow natural light in.
Q3: How often should I update my home decor?
A3: There’s no strict rule for updating decor. Major overhauls typically happen every 5-10 years, but smaller updates can be done seasonally or whenever you feel like a change. Consider:
- Seasonal Changes: Swap out textiles, mantel decor, or small accents for holidays or seasons (e.g., pumpkin decorating ideas for fall, Christmas door decorations for winter).
- New Trends: Incorporate new trends through budget-friendly items like throw pillows, vases, or small artworks.
- Life Changes: Moving, having a baby (hello, baby shower decorations!), or career changes often prompt decor updates.
- When You’re Bored: If a room no longer inspires you, it’s time for a refresh! Even rearranging furniture (decoro) can make a big difference.
Q4: I’m new to DIY. What’s an easy decorating project to start with?
A4: Start with low-commitment, high-impact projects:
- Painting an accent wall: Choose a small wall and a bold color. It’s a great way to experiment with color theory.
- Stenciling: Try a simple pattern on a small piece of furniture or an accent wall (refer to our paint wall with stencils section).
- Creating a gallery wall: Curate existing photos and art, or print affordable digital art.
- Updating small furniture: Paint an old side table or dresser, or add new hardware.
- Making a wreath: A simple seasonal wreath for your front door or an interior wall.
Q5: How can I make my decor feel more “personal” and less generic?
A5: Personalization is key to making a house a home:
- Display Your Memories: Frame personal photos, display souvenirs from trips, or showcase sentimental items.
- Showcase Your Hobbies: Incorporate elements related to your passions, whether it’s books, art supplies, musical instruments, or sports memorabilia.
- Mix & Match: Avoid buying full matching sets of furniture. Combine pieces from different eras or styles.
- Collect Art That Speaks to You: Don’t just buy what’s trendy; choose pieces that evoke emotion or meaning for you.
- DIY Touches: Handmade elements (Decora DTI spirit) instantly add personal character that can’t be bought.
- Embrace Your Story: Let your home tell the story of who you are, where you’ve been, and what you love.