Fresh Decor Ideas to Elevate Your Home for Any Occasion
The Art of Transformation: Why Decor Matters in Every Space and Celebration
Estimated reading time: 24 minutes
Key Takeaways
- Decorating transcends aesthetics, profoundly influencing moods, well-being, and memories in every space and celebration.
- Personalize your home by infusing your unique style and passions, transforming rooms into reflections of your personality.
- Discover practical and creative ideas for elevating everyday spaces, from serene bathroom wall decor to inviting dining room art and dynamic mantel displays.
- Celebrate life’s milestones with thoughtful event decor, offering unique ideas for baby showers, seasonal pumpkin crafts, and whimsical Grinch Christmas decorations.
- Leverage foundational elements like Floor & Decor tiles and embrace DIY projects to build a cohesive and authentically decorated home.
Table of Contents
- The Art of Transformation: Why Decor Matters in Every Space and Celebration
- Elevating Everyday Spaces: Home Decor Essentials
- Celebrating Life’s Moments: Event & Festive Decor Ideas
- Foundational Elements & Inspiration: Building Your Decor Vision
- FAQs: Your Decorating Questions Answered
- How do I choose a cohesive theme for my home decor?
- What are budget-friendly ways to update my bathroom wall decor?
- When should I start planning my Christmas door decorations?
- How can I make my graduation cap decoration last?
- Where can I find design inspiration for Floor & Decor tiles?
- How can I make my holiday decorations more eco-friendly?
- Conclusion: Your Journey to a Beautifully Decorated Life
The Art of Transformation: Why Decor Matters in Every Space and Celebration
Decorating is more than just arranging objects; it’s an act of creation, a personal statement that transforms a mere space into a living, breathing reflection of its inhabitants. Whether you’re refreshing your everyday living areas, gearing up for a festive celebration, or marking a significant life milestone, the right decor has the power to elevate moods, tell stories, and create lasting memories. From the serene sanctuary of bathroom wall decor to the whimsical charm of Grinch Christmas decorations, every choice contributes to an overarching narrative.
In this comprehensive guide, we’ll embark on a journey through myriad decorating possibilities. We’ll explore easy and creative ideas for home and event decorating, delve into practical tips for styling everything from your mantel to your front door, and uncover inspiration that spans from Martha Stewart’s iconic yellow kitchen decor to innovative paint wall with stencils techniques. Get ready to discover how thoughtful design, even in the smallest details like graduation cap decoration, can profoundly impact your environment and your well-being. We’ll also touch upon finding quality materials like Floor & Decor tiles and understanding the art of “decorarán” (they will decorate) and “decoro” (I decorate) in practice, empowering you to craft spaces that not only look good but feel good.
Beyond Aesthetics: The Impact of Thoughtful Decor
The aesthetics of our surroundings significantly influence our daily lives. A beautifully decorated space isn’t just pleasing to the eye; it can foster feelings of comfort, inspiration, and productivity. Consider the calming effect of a well-appointed bathroom or the inviting warmth of a festive holiday display. Thoughtful decor contributes to a sense of order and serenity, much like the principles championed by those who advocate for organized living. It’s about crafting environments where you and your family can truly thrive, where every element serves a purpose, whether functional or purely decorative. When spaces are intentionally designed, they become more than just rooms; they become backdrops for life’s most precious moments.
Personalizing Your Space: A Reflection of You
Your home is an extension of your personality, and decorating offers an unparalleled opportunity for self-expression. It’s about infusing your tastes, passions, and history into your surroundings. From selecting a bold pattern for a paint wall with stencils project to curating a gallery wall of cherished memories, each decision contributes to a uniquely personal narrative. This personalization extends to event decor as well, where themes like baby shower decorations or Grinch Christmas decorations allow you to infuse celebrations with your unique style and humor. Ultimately, decor is about creating a space that resonates with your soul, making it truly yours.
Elevating Everyday Spaces: Home Decor Essentials
Our homes are our havens, and the decor we choose for them shapes our daily experiences. From functional bathrooms to convivial dining rooms, every area offers an opportunity to inject style, personality, and comfort. Let’s explore how to transform these essential spaces with creative and easy ideas.
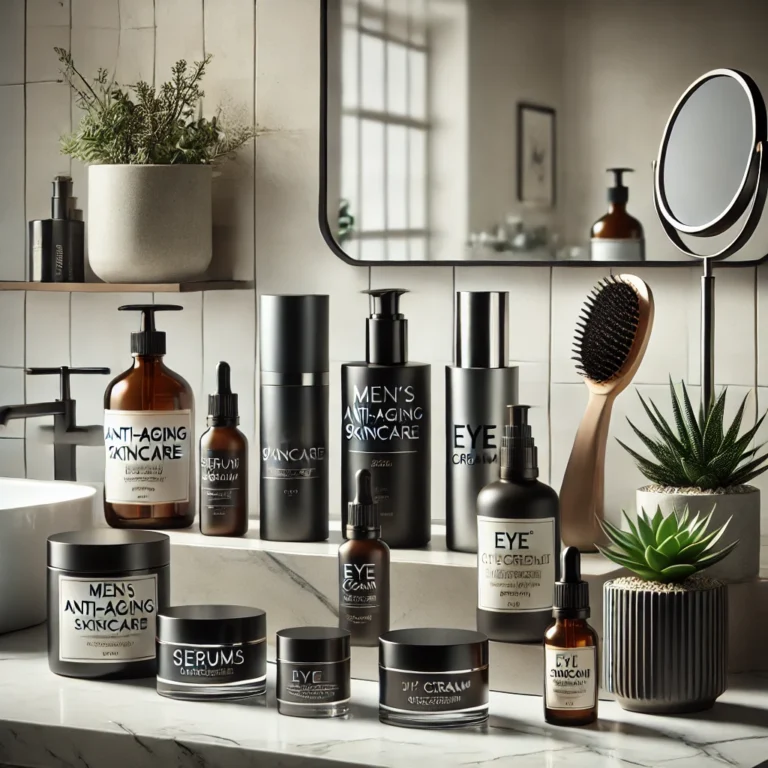
Bathroom Wall Decor: Sanctuary & Style Combined
The bathroom, often overlooked, holds immense potential as a personal sanctuary. Effective bathroom wall decor can transform it from a utilitarian space into a spa-like retreat, a minimalist haven, or a vibrant statement room. It’s about blending functionality with aesthetic appeal.
Choosing a Theme: Spa-like, Modern, or Rustic
Before diving into specific pieces, consider the overall mood you want to create.
- Spa-like: Think serene colors (blues, greens, neutrals), natural materials, soft lighting, and minimalist art.
- Modern: Clean lines, geometric patterns, bold contrasts (black and white), and abstract art characterize this look.
- Rustic: Embrace reclaimed wood, distressed finishes, vintage signs, and earthy tones for a cozy, grounded feel.
- Transitional: A blend of classic and contemporary elements offers timeless elegance, allowing you to incorporate diverse pieces.
Materials & Textures: Tiles, Wood, Mirrors, and Art
The choice of materials profoundly impacts the bathroom’s ambiance.
- Tiles: Floor & Decor offers an extensive selection of tiles, from large-format porcelain that creates a seamless, luxurious look to intricate mosaic tiles perfect for accent walls. Consider subway tiles for a classic feel or patterned tiles for a bold statement. They are durable, water-resistant, and come in countless styles.
- Wood Accents: Even in a humid environment, well-sealed wood shelves, paneling, or mirror frames can add warmth and natural texture.
- Mirrors: Beyond their practical use, mirrors are fantastic decorative elements. A large, ornate mirror can become a focal point, while multiple smaller mirrors can create a gallery effect, expanding the perceived space and reflecting light.
- Art: Waterproof or framed prints, botanical illustrations, abstract pieces, or even unique wall sculptures can infuse personality. Choose art that complements your chosen theme and color palette.
- Shelving: Open shelving, made of wood or glass, can display folded towels, decorative bottles, or small plants, adding both storage and visual interest.
Smart Storage & Display Solutions
Clutter can quickly undermine any decor effort. Integrated storage is key.
- Recessed Niches: Ideal for shower walls or above the vanity, these provide sleek, space-saving storage for toiletries.
- Floating Shelves: Offer a minimalist look while providing space for decorative items or small essentials.
- Stylish Cabinets: Vanity cabinets with thoughtful organization inside keep daily items out of sight.
- Ladder Shelves: A trendy option for towels and decorative baskets, adding vertical interest.
- Wall-Mounted Baskets: Rustic or wire baskets can hold extra toilet paper, magazines, or small towels, combining utility with aesthetic appeal.
DIY Touches for a Personal Retreat
Inject your personality with handmade elements.
- Painted Mason Jars: Use them to hold toothbrushes, cotton swabs, or flowers.
- Stenciled Wall Accent: A subtle stencil pattern on one wall can add texture and design without overwhelming the space.
- Framed Prints: Print and frame your own photography or free printable art that fits your theme.
- Rope Wrapped Mirrors: Give an old mirror a nautical or rustic twist by hot-gluing rope around the frame.
- Custom Shower Curtains: Dye or stencil a plain shower curtain for a truly unique look.
Dining Room Wall Decor: Setting the Perfect Ambiance
The dining room is where meals are shared, conversations flow, and memories are made. Its walls offer a prime canvas for setting the perfect ambiance, whether for intimate family dinners or lively social gatherings.
Gallery Walls: Curating Your Story
Gallery walls are a fantastic way to personalize your dining space, allowing you to showcase a collection of art, photographs, or objects that tell a story.
- Theme and Cohesion: Choose a theme (e.g., travel photos, abstract art, family portraits) or a consistent color palette or frame style to create a cohesive look.
- Layout Planning: Arrange frames on the floor first to experiment with different layouts before hanging them. Consider a symmetrical grid for a formal look or an asymmetrical arrangement for a more eclectic vibe.
- Mixed Media: Don’t be afraid to mix framed prints with mirrors, small shelves, or even unique objects like decorative plates or small sculptures.
Statement Pieces: Art, Mirrors, and Murals
Sometimes, one bold piece is all you need to make an impact.
- Large-Scale Art: A single oversized painting or print can anchor the room, drawing the eye and setting the tone.
- Grand Mirrors: A large, decorative mirror can make a dining room feel more spacious and luxurious, reflecting light and amplifying the room’s beauty.
- Wall Murals: For a truly immersive experience, a hand-painted or wallpaper mural can transport your dining room to another place, from a tranquil landscape to an abstract dreamscape.
Lighting as Decor: Chandeliers and Sconces
Lighting isn’t just functional; it’s a critical element of dining room decor.
- Chandeliers: A statement chandelier over the dining table can be the centerpiece of the room, adding elegance and defining the dining area.
- Sconces: Wall-mounted sconces can provide ambient lighting, highlight specific areas of the wall decor, and add architectural interest.
- Dimmers: Install dimmers to adjust the mood, from bright for family meals to soft and romantic for dinner parties.
Practical Elegance: Shelving and Buffets
Combine decor with functionality to enhance your dining experience.
- Built-in Shelving: Display cherished dishware, glassware, or decorative objects.
- Buffet or Sideboard: A stylish buffet offers surface space for serving dishes and ample storage for linens and tableware, while its top can be adorned with lamps, plants, and decorative items.
- Floating Shelves: A minimalist option for displaying small pieces of art or decorative bottles.
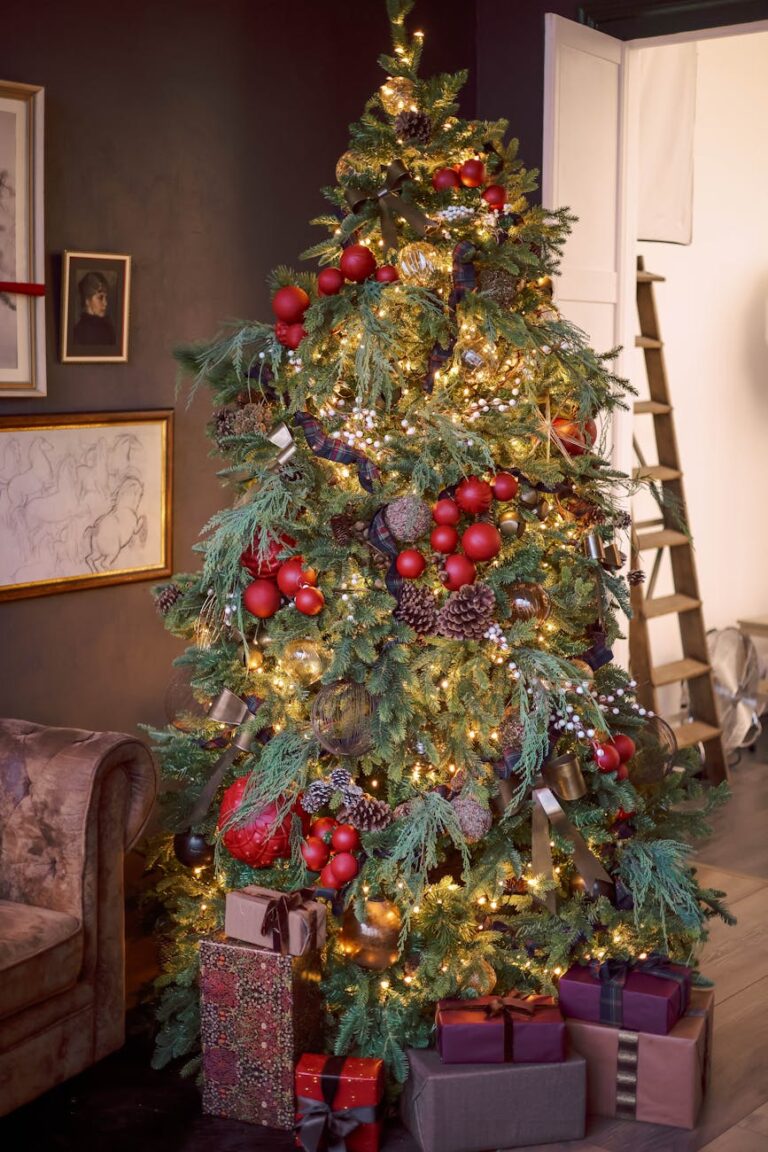
Mantel Decor: The Heart of the Room’s Display
The mantelpiece is often the focal point of a living room or family room, providing a perfect stage for seasonal displays, personal collections, and artistic arrangements. Effective mantel decor balances visual interest with personal significance.
Seasonal Styling: From Cozy Fall to Festive Winter
The mantel is ideal for seasonal transformations.
- Fall: Incorporate mini pumpkins, gourds (excellent pumpkin decorating ideas here!), autumn leaves, candles, and warm metallic accents.
- Winter/Christmas: Garlands, fairy lights, ornaments, stockings, and winter greenery create a festive wonderland. Think about using Grinch Christmas decorations for a fun, whimsical touch.
- Spring: Bring in fresh flowers, pastel colors, bird motifs, and light, airy textures.
- Summer: Nautical themes, vibrant colors, shells, and travel souvenirs can evoke warm weather vibes.
Layering Techniques: Height, Depth, and Texture
Mastering the art of layering is key to a dynamic mantel display.
- Varying Heights: Use objects of different heights (e.g., tall candles, medium-sized frames, short vases) to create visual flow.
- Depth: Place some items closer to the wall and others nearer the edge of the mantel to add dimension.
- Texture: Mix materials like wood, metal, ceramic, glass, and fabric to create tactile interest.
- Symmetry vs. Asymmetry: A symmetrical arrangement offers a formal, balanced look, while an asymmetrical one can feel more relaxed and artistic.
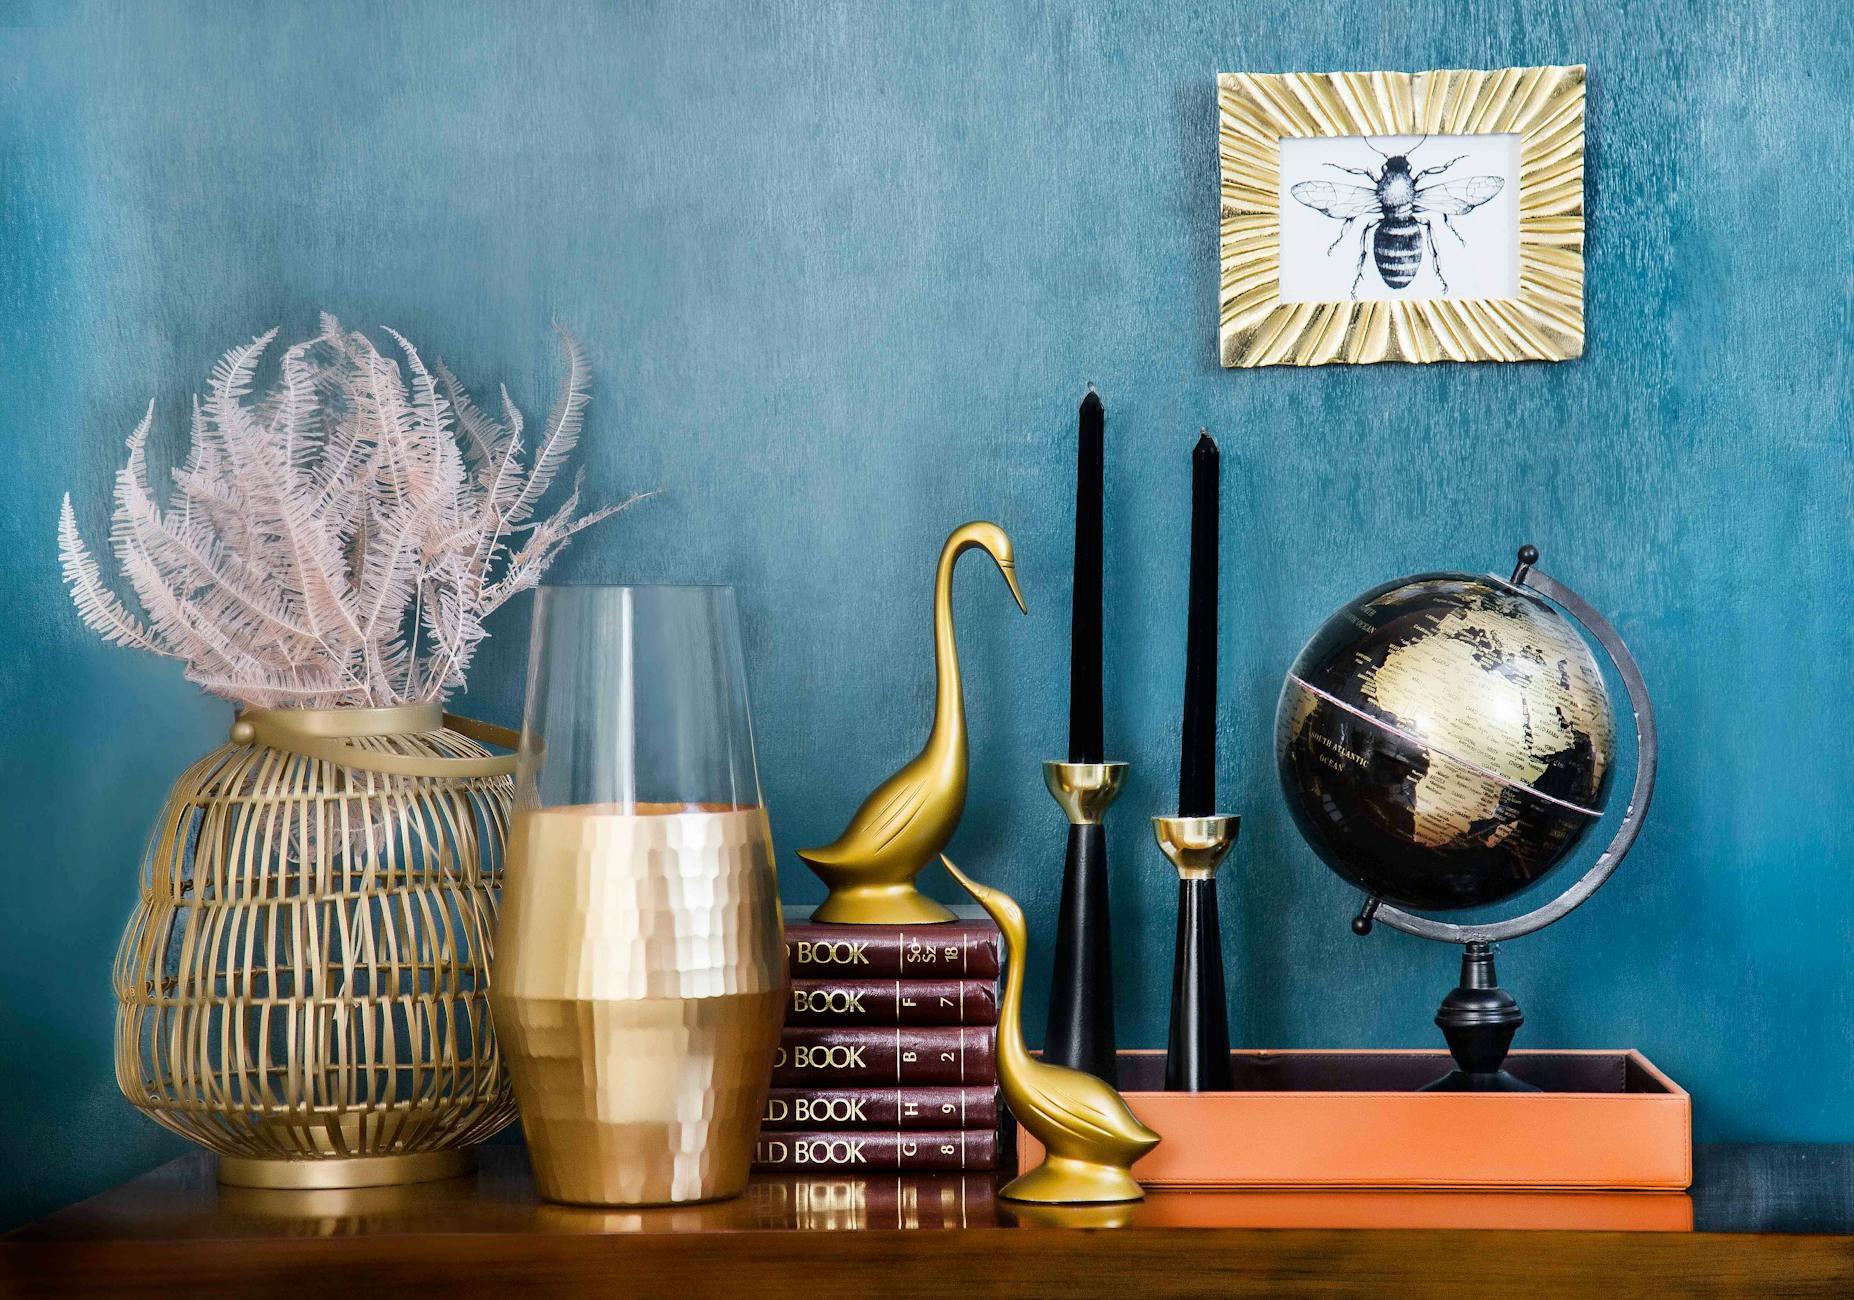
Incorporating Personal Treasures
The mantel is a perfect spot to display items that hold special meaning.
- Photographs: Framed family photos or cherished memories.
- Souvenirs: Travel mementos or gifts from loved ones.
- Heirlooms: Antique clocks, vases, or small sculptures that have been passed down.
- Collections: Display a curated collection of small objects like vintage cameras, teacups, or miniature figurines.
Safety and Functionality
While decorating, always keep safety in mind, especially if a fireplace is in use.
- Clearance: Keep flammable items away from the fireplace opening.
- Stability: Ensure all items are stable and not prone to falling.
- Wiring: Conceal any wires from lighting or electronic decor.
- Child and Pet Safety: If you have young children or curious pets, secure delicate or breakable items.
Martha Stewart Yellow Kitchen Decor: Timeless Charm
Martha Stewart is synonymous with elegant, classic, and often aspirational home decor. Her take on yellow kitchen decor exemplifies a timeless charm that blends warmth with sophistication, creating a space that is both inviting and highly functional.
Embracing the Sunny Hue: Paint and Accents
Yellow in the kitchen is inherently cheerful and stimulating.
- Wall Color: A soft, buttery yellow can make a kitchen feel bright and expansive, while a deeper mustard yellow offers a more traditional, cozy vibe.
- Cabinetry: Martha often showcases kitchens with yellow cabinetry, ranging from pale cream to vibrant sunshine, paired with classic hardware.
- Accents: If a full yellow kitchen feels too bold, incorporate the hue through accents like curtains, dishware, canisters, or floral arrangements.
Farmhouse Flair and Classic Elegance
Martha Stewart’s yellow kitchens often marry farmhouse elements with classic design.
- Shaker Cabinets: Simple, clean-lined shaker-style cabinets are a staple.
- Subway Tiles: White subway tiles provide a clean backdrop that allows the yellow to pop.
- Butcher Block or Marble Countertops: These natural materials add warmth and luxury.
- Apron-Front Sinks: A classic farmhouse feature that adds character.
- Open Shelving: Displaying beautiful pottery, glassware, and cookbooks adds to the charming, lived-in feel.
Functional Beauty: Open Shelving and Organization
A hallmark of Martha Stewart’s style is the seamless integration of beauty and utility.
- Open Shelving: Strategically placed open shelves display curated collections of white dishes, colorful pottery, or copper cookware, turning everyday items into decor.
- Basket Storage: Wicker or wire baskets provide stylish storage for produce or kitchen essentials, contributing to an organized yet inviting aesthetic.
- Utensil Crocks: Keep cooking utensils readily accessible and neatly displayed in attractive crocks on the countertop.
- Pantry Organization: A well-organized pantry, often with clear containers and labels, is an extension of the kitchen’s functional beauty.
Integrating Modern Appliances with Vintage Touches
Achieving the Martha Stewart look often involves blending modern convenience with vintage charm.
- Stainless Steel Appliances: Modern appliances can be seamlessly integrated by choosing models that complement the overall aesthetic.
- Vintage Finds: Incorporate antique scales, copper pots, vintage signs, or a classic stand mixer in a matching hue to add character.
- Classic Fixtures: Bridge the gap with timeless fixtures like gooseneck faucets or vintage-style pendant lights.
Unleashing Creativity with Paint Wall with Stencils
For those seeking a custom look without the commitment or cost of wallpaper, paint wall with stencils offers an incredibly versatile and rewarding solution. It’s a fantastic way to add intricate patterns, bold designs, or subtle textures to any room.
Choosing the Right Stencil Pattern and Size
The key to a successful stenciling project lies in selecting the perfect design.
- Pattern Types: From geometric shapes (like Moroccan tiles or art deco patterns) to intricate florals, damasks, or even custom designs, the possibilities are endless.
- Scale: Consider the size of your room and the wall. A large, bold pattern can work well on an accent wall in a spacious room, while a smaller, delicate pattern might be better suited for a powder room or an all-over treatment in a cozier space.
- Style Match: Ensure the stencil pattern complements your existing decor style, whether it’s bohemian, traditional, contemporary, or eclectic.
Techniques for Flawless Application
Achieving crisp, clean stencil lines requires patience and proper technique.
- Preparation: Ensure your wall is clean, dry, and smooth. Apply a base coat of paint and let it dry completely.
- Adhesion: Use painter’s tape or repositionable spray adhesive to secure the stencil firmly to the wall. This prevents paint from bleeding underneath.
- Paint Application: Use a stencil brush, foam roller, or sponge. Load only a small amount of paint to avoid saturation. Dab or roll the paint onto the stencil, working from the outside edges inwards. Multiple thin coats are better than one thick coat.
- Drying and Removal: Allow the paint to dry slightly before carefully peeling off the stencil to prevent smudging.
Accent Walls vs. All-Over Patterns
Decide whether you want to create a focal point or an immersive experience.
- Accent Wall: Stenciling a single wall creates a dramatic feature that draws the eye, perfect for behind a bed, sofa, or dining table.
- All-Over Pattern: For a wallpaper-like effect, an all-over pattern can add depth and sophistication to an entire room. This works particularly well in smaller spaces or with subtle patterns.
- Borders or Details: Stencils can also be used for intricate borders, ceiling medallions, or to create faux wainscoting.
Stencils for Every Style: Geometric, Floral, Moroccan
Stencils are adaptable to virtually any aesthetic.
- Geometric: Modern and minimalist rooms benefit from crisp, interlocking geometric designs.
- Floral: Bring nature indoors with delicate or bold floral patterns, perfect for creating a romantic or botanical vibe.
- Moroccan: Intricate, tessellated Moroccan patterns add an exotic, luxurious touch, often working beautifully in bathroom wall decor or a cozy reading nook.
- Nursery/Children’s Rooms: Stencils are excellent for adding playful elements like stars, clouds, animals, or alphabet letters.
Celebrating Life’s Moments: Event & Festive Decor Ideas
Life is a series of moments, big and small, that deserve to be celebrated. Decor plays a pivotal role in setting the scene for these special occasions, transforming ordinary spaces into unforgettable backdrops for joy, laughter, and camaraderie.
Baby Shower Decorations: Welcoming New Beginnings
A baby shower is a joyous occasion to celebrate the impending arrival of a new life. Thoughtful baby shower decorations create a heartwarming and Instagram-worthy atmosphere for guests and the expectant parents.
Theme Selection: Whimsical, Elegant, or Gender-Neutral
Choosing a theme provides a cohesive vision for all your decor elements.
- Whimsical: Think “Twinkle, Twinkle Little Star,” “Oh Boy/Girl,” or “Safari Adventure” with playful colors and charming characters.
- Elegant: Opt for sophisticated palettes like blush pink and gold, mint and silver, or classic white with greenery, incorporating floral arrangements and delicate accents.
- Gender-Neutral: Themes like “Little Peanut,” “Ready to Pop,” “Storybook Forest,” or “Hello Baby” with yellow, gray, and green tones are increasingly popular.
Creative Backdrops and Photo Booths
A dedicated photo area is a must for capturing memories.
- Balloon Arches: A stunning and popular choice, a balloon arch in theme colors can frame the main dessert table or serve as a photo backdrop.
- Greenery Walls: Create a lush backdrop using artificial or real foliage, perhaps adorned with flowers or fairy lights.
- Custom Banners: A personalized banner announcing “Baby [Last Name]” or “Welcome Little One” adds a special touch.
- Themed Props: Provide fun props like baby rattles, pacifiers, oversized onesies, or speech bubbles for photo booth guests.
Table Settings and Centerpieces
The food and gift tables are often central to the decor.
- Themed Tablecloths: Use tablecloths that match your color scheme or feature playful patterns.
- Cute Centerpieces: Diaper cakes, floral arrangements in baby bottles, mini-stuffed animals, or small planters can serve as charming centerpieces.
- Candy Bar: A coordinated candy bar with treats in theme colors is a delightful addition.
- Personalized Place Settings: If it’s a seated affair, consider personalized place cards or small favors.
DIY Decor: Banners, Favors, and Balloons
Handmade touches add warmth and personality.
- Hand-Stamped Banners: Create custom banners with baby’s name or cute phrases.
- DIY Favors: Small sachets of candy, mini succulent plants, or personalized seed packets make thoughtful take-home gifts.
- Balloon Bouquets: Assemble your own balloon bouquets with different sizes and shapes, incorporating foil balloons for extra sparkle.
- Paper Lanterns: Hang paper lanterns in various sizes and colors to add a soft glow.
Pumpkin Decorating Ideas: Fall Festivities Reimagined
Pumpkins are the quintessential symbol of autumn and Halloween, offering a blank canvas for endless creative expression. Beyond traditional carving, there’s a world of pumpkin decorating ideas to explore.
No-Carve Creativity: Paint, Glitter, and Decoupage
No-carve pumpkins last longer and offer unique artistic possibilities.
- Painted Pumpkins: Use acrylic paints to create intricate designs, abstract patterns, stripes, polka dots, or even ombre effects. Consider glow-in-the-dark paint for a spooky twist.
- Glitter Glam: Apply adhesive and sprinkle glitter for sparkling pumpkins that catch the light.
- Decoupage: Use Mod Podge to adhere fabric scraps, lace, tissue paper, or magazine cutouts to your pumpkins for a personalized, textured look.
- Marker Art: Permanent markers allow for detailed drawings, lettering, or intricate patterns without the mess of carving.
- Washi Tape: Create geometric patterns or stripes with colorful washi tape.
Carving Techniques: Classic to Contemporary
For those who love the tradition of carving, elevate your skills.
- Classic Faces: From goofy grins to scary scowls, classic jack-o’-lanterns never go out of style.
- Stencils: Use printable stencils for more intricate designs, from spooky bats to elegant monograms.
- Etching: Instead of cutting all the way through, etch away the top layer of skin for a subtle, glowing effect.
- 3D Carving: Go beyond the surface by carving relief designs or creating three-dimensional elements.
- Tools: Invest in a good pumpkin carving kit with various tools for precision and safety.
Incorporating Natural Elements
Blend your pumpkins with nature’s bounty for a rustic, organic display.
- Leaves and Vines: Arrange pumpkins with real or artificial autumn leaves, grapevines, or dried corn husks.
- Pinecones and Acorns: Scatter pinecones, acorns, and other natural treasures around your pumpkin display.
- Flowers and Berries: Add small bouquets of fall flowers or branches with vibrant berries to your arrangements.
- Cornucopia: Create a beautiful cornucopia display with pumpkins, gourds, fruits, and vegetables.
Displaying Your Pumpkin Masterpieces
Showcase your decorated pumpkins effectively.
- Porch Displays: Arrange pumpkins of various sizes and colors on your front porch steps, perhaps alongside potted mums or hay bales.
- Table Centerpieces: Use a cluster of decorated pumpkins as a striking centerpiece for your dining table or coffee table.
- Window Sills: Smaller pumpkins can adorn window sills, adding a festive touch both inside and out.
- Entryway Vignettes: Create an inviting display on an entryway table with pumpkins, candles, and fall foliage.
Grinch Christmas Decorations: Whimsical Holiday Spirit
For those who love a dash of mischievous humor with their holiday cheer, Grinch Christmas decorations are a fantastic way to embrace the whimsical spirit of “How the Grinch Stole Christmas.” It’s about bringing Whoville to life in your own home.
Capturing the Grinch’s Essence: Colors and Characters
The Grinch aesthetic is distinct and fun.
- Color Palette: Focus on the Grinch’s signature lime green, paired with vibrant reds, whites, and touches of classic Christmas colors.
- Character Figures: Incorporate figures of the Grinch, Cindy Lou Who, Max the dog, and other Whoville residents.
- Wonky Shapes: Embrace the slightly off-kilter, playful shapes reminiscent of Whoville architecture and decor.
DIY Grinch Projects: Ornaments, Wreaths, and Figures
Unleash your inner Whoville artisan with handmade Grinch decor.
- Grinch Ornaments: Create ornaments featuring the Grinch’s face, his iconic green hand holding a red ornament, or small Whoville houses.
- Grinch Wreaths: Craft wreaths adorned with green mesh, red ribbons, and a pair of Grinch legs or a cutout of his mischievous face.
- Grinch Figures: Make stand-up cutouts of the Grinch peeking from behind doors or in windows, or create smaller figures for table displays.
- “Stolen” Presents: Decorate wrapped boxes to look like they’ve been pilfered, with a Grinch hand reaching for them.
Transforming Your Home into Whoville
Extend the Grinch theme beyond a single item.
- Twisted Trees: Emulate the whimsical, bent trees of Whoville by gently bending branches on your artificial tree or adding decorative twists.
- Over-the-Top Lights: Use lots of colorful lights, perhaps in unexpected patterns or with playful, oversized bulbs.
- Signs with Grinch Quotes: Place signs around your home featuring memorable quotes from the story.
- Grinch Table Settings: Use green tablecloths, red placemats, and Grinch-themed plates or napkins for a festive meal.
Creative Display Ideas
Position your Grinch decor strategically for maximum impact.
- Grinch Tree: Dedicate a whole Christmas tree to the Grinch theme, using only green, red, and white ornaments, plus Grinch figures.
- Doorway Grinch: Have a cutout of the Grinch appearing to steal presents from your entryway.
- Mantle Display: Arrange smaller Grinch figures, Whoville houses, and green and red candles on your mantel.
- Outdoor Display: Set up a fun outdoor scene with inflatable Grinch characters or lights in the shape of the Grinch.
Christmas Door Decorations: A Grand Entrance
The front door is the first impression of your home during the holidays, and Christmas door decorations set the festive tone for guests and passersby. A beautifully adorned door welcomes everyone with warmth and holiday spirit.
Garland and Wreath Styling: Classic to Modern
Garland and wreaths are quintessential Christmas door decorations.
- Classic Greenery: Opt for traditional evergreen garlands and wreaths, embellished with red berries, pinecones, and bows.
- Modern Twist: For a contemporary look, choose minimalist wreaths (e.g., a simple hoop with a few sprigs of eucalyptus) or garlands with unconventional elements like metallic ornaments or unique fabrics.
- Layering: As Abby Lawson’s blog might suggest for organized yet beautiful spaces, consider layering different types of garland for depth – perhaps a thick evergreen base with a thinner, more decorative garland intertwined.
- Placement: Hang garland around the door frame, above the door, or down the sides of the porch columns. Ensure it’s securely fastened to withstand winter weather, referencing tips on how to hang outdoor Christmas garland effectively.
Lighting and Festive Accents
Illuminate your entrance for a magical glow.
- Fairy Lights: Weave fairy lights through your garland and wreath for a subtle, enchanting sparkle.
- Larger Bulbs: For a bolder statement, use larger, colorful LED bulbs that stand out.
- Spotlights: Angle small spotlights to highlight your wreath or other decorative elements.
- Ribbons and Bows: Add large, weather-resistant ribbons and bows in traditional red, green, or gold, or choose colors that match your specific theme (e.g., silver and blue for a winter wonderland).
- Ornaments: Hang shatterproof ornaments from your garland or within your wreath for extra sparkle and color.
Personalizing Your Holiday Welcome
Infuse your personality into your door decor.
- Monograms: Add a large, festive monogram letter to your wreath.
- Personalized Signs: Create a small sign that says “Happy Holidays from The [Your Last Name] Family.”
- Themed Ornaments: Hang ornaments that reflect your hobbies or family traditions.
- DIY Elements: Craft handmade bows or small decorative figures to incorporate into your garland.
Durability for Outdoor Displays
Outdoor decor needs to withstand the elements.
- Weather-Resistant Materials: Choose garlands, wreaths, and ornaments made from materials designed for outdoor use.
- Secure Fastening: Use strong hooks, zip ties, or floral wire to firmly attach garland and wreaths, especially in windy areas. (This echoes Abby Lawson’s practical advice on securing outdoor decorations).
- LED Lights: Opt for LED lights, which are more durable and energy-efficient for outdoor use.
- Shelter: If possible, place delicate items under a porch overhang to protect them from direct rain or snow.
Graduation Cap Decoration: A Personal Achievement Canvas
A graduation cap is more than just academic regalia; it’s a symbolic canvas for celebrating hard-earned achievements, expressing gratitude, and declaring future aspirations. Graduation cap decoration has become a beloved tradition, allowing graduates to stand out in a sea of identical caps.
Brainstorming Themes and Messages
Start with what’s most meaningful to you.
- Major/Field of Study: Represent your academic discipline with symbols, formulas, or motifs (e.g., a DNA helix for biology, a blueprint for engineering).
- Future Plans: Illustrate your post-graduation dreams, whether it’s a map highlighting travel, a logo of your dream company, or symbols of your chosen career path.
- Gratitude: Thank family, friends, professors, or pets who supported you.
- School Spirit: Incorporate school colors, mascots, or mottos.
- Inspirational Quotes: Choose a quote that motivated you throughout your journey.
Materials and Techniques: Paint, Glitter, 3D Elements
The sky’s the limit when it comes to materials.
- Paint: Acrylic paints are excellent for detailed designs and lettering. Use fine brushes for precision.
- Glitter: Adds sparkle and pizzazz. Apply a thin layer of glue, then sprinkle glitter generously.
- Cardstock/Construction Paper: Cut out shapes, letters, or images and glue them onto the cap. Layering different colors can create depth.
- Fabric/Ribbons: Add texture with fabric cutouts, bows, or ribbons around the edge of the cap.
- 3D Elements: Small artificial flowers, miniature figures, rhinestones, or even LED lights can make your cap truly pop.
- Hot Glue/Fabric Glue: Use strong adhesives to ensure all decorations stay put throughout the ceremony.
Ensuring Durability and Visibility
Your cap needs to look great from a distance and last through the event.
- Secure Adhesion: Use plenty of glue, especially for heavier elements, to prevent anything from falling off.
- Sealant: For painted designs, a clear spray sealant can protect against smudging and light moisture.
- Large Fonts/Bold Designs: Choose designs and fonts that are easily visible from a distance, as many people will be viewing your cap from afar.
- Avoid Overcrowding: While it’s tempting to add everything, a few well-executed elements often look better than a cluttered design.
Expressing Individuality and Future Hopes
This is your moment to shine!
- Personal Anecdotes: Incorporate inside jokes or references unique to your college experience.
- Handwritten Elements: A personal touch of your own handwriting can add authenticity.
- Signature Elements: If you have a personal catchphrase or symbol, include it.
- Aspirations: Let your cap be a beacon for your future, reflecting the next chapter of your life. It’s a moment to look forward while celebrating the past.
Foundational Elements & Inspiration: Building Your Decor Vision
Beyond individual rooms and specific events, there are foundational elements and sources of inspiration that underpin any successful decorating project. Understanding these broad concepts can help you weave together a cohesive and beautiful vision for your entire home.
Floor & Decor: Tiles and Design Solutions
When it comes to flooring and wall coverings, Floor & Decor stands out as a go-to destination for both homeowners and professionals. Their vast selection of tiles and other materials provides endless possibilities for every design aesthetic, transforming basic surfaces into statements of style and durability.
Exploring the Vast Selection: From Ceramic to Hardwood
Floor & Decor is renowned for its immense inventory, catering to diverse tastes and functional needs.
- Tile Varieties: Discover a staggering array of ceramic, porcelain, natural stone (marble, granite, travertine, slate), glass, and metal tiles. These are perfect for bathroom wall decor, kitchen backsplashes, accent walls, and, of course, floors.
- Wood Flooring: Explore solid hardwood, engineered wood, and laminate options in various species, finishes, and plank sizes.
- Luxury Vinyl Plank (LVP): A popular choice for its durability, water resistance, and realistic wood or stone look, ideal for high-traffic areas.
- Mosaics and Medallions: Intricate mosaic patterns and pre-designed medallions add a touch of artistry to floors and walls.
- Outdoor Options: Find weather-resistant tiles and pavers for patios, walkways, and pool surrounds.
Finding Floor and Decor Locations Near You
With numerous showrooms across the country, finding a local Floor & Decor location is generally easy.
- Online Locator: Use their website’s store locator to input your zip code and find the nearest store, along with hours and contact information.
- Product Availability: Check online for product availability at your preferred location before visiting.
- Showroom Experience: Visiting a physical store allows you to see and touch the materials, envision them in your space, and get expert advice.
Design Inspiration and Consultation Services
Floor & Decor isn’t just a retail outlet; it’s a source of inspiration and support for your design journey.
- In-Store Displays: Showrooms feature beautifully designed vignettes that showcase various tile and flooring combinations, offering practical inspiration for different rooms and styles.
- Design Services: Many locations offer free design services, where experienced designers can help you select materials, create layouts, and visualize your project.
- Online Galleries: Their website hosts extensive photo galleries and project ideas, illustrating how different products can be used to achieve desired looks.
- DIY Resources: Find guides and videos for DIY installation, empowering you to tackle projects like paint wall with stencils or tile installation yourself.
DIY-Friendly Options and Professional Installation
Whether you’re a seasoned DIYer or prefer professional help, Floor & Decor accommodates both.
- Tools and Accessories: They stock a full range of installation tools, adhesives, grout, and sealants for every type of flooring and tile project.
- Educational Workshops: Some locations offer workshops on tiling and flooring installation, giving you hands-on experience and confidence.
- Referral Network: For those who prefer professional installation, Floor & Decor often has a network of trusted installers they can recommend.
Decora DTI: Embracing DIY and Creative Expression
“Decora” often refers to a Japanese street fashion subculture characterized by bright colors, layers, and an abundance of accessories. However, in a broader decorating context, “Decora DTI” (Do It Yourself) speaks to a vibrant, personalized, and often quirky approach to home decor that values handmade elements, upcycling, and maximalist self-expression. It’s about creating a space that is authentically “you,” regardless of conventional trends.
Understanding the Decora Aesthetic
While the fashion subculture is specific, the underlying principles of “decora” can be applied to home decor.
- Bold Colors: Don’t shy away from bright, clashing, or unconventional color combinations.
- Layering: Instead of minimalism, embrace layering different textures, patterns, and objects.
- Personalization: Every item should reflect your interests, hobbies, and personality.
- Playfulness: Inject humor, whimsy, and a sense of fun into your decor choices.
- Eclectic Mix: Combine elements from different styles, eras, and cultures without fear.
Upcycling and Repurposing for Unique Decor
A core tenet of Decora DTI is giving new life to old items, creating truly unique pieces.
- Furniture Transformation: Paint an old dresser a vibrant color, add new knobs, or decoupage it with fabric.
- Found Objects as Art: Turn vintage toys, old records, or forgotten trinkets into wall art or decorative displays.
- Container Reuse: Mason jars, old tins, or vintage bottles can be transformed into vases, storage, or decorative accents.
- Fabric Scraps: Use fabric scraps to create patchwork pillows, curtains, or unique wall hangings.
Crafting Your Own Accessories and Furniture
The DIY spirit is central to Decora DTI.
- Handmade Wall Art: Paint your own canvases, create collages, or craft yarn wall hangings.
- Custom Pillows: Sew pillows from interesting fabrics or adorn plain pillows with embroidery or appliques.
- Painted Furniture: Give old chairs, tables, or shelves a fresh, personalized look with paint and stencils.
- Unique Lighting: Personalize lampshades with fabric, beads, or paint.
Community and Inspiration for DIY Enthusiasts
The Decora DTI approach thrives on shared ideas and creative energy.
- Online Communities: Explore Pinterest (like Abby Lawson’s organized boards!), Instagram, and DIY blogs for endless inspiration and tutorials.
- Thrift Stores and Flea Markets: These are treasure troves for finding unique items to upcycle and repurpose.
- Local Craft Stores: Discover materials and tools for your next DIY project.
- Creative Collaboration: Share ideas and projects with friends who also enjoy DIY decor.
Decorarán & Decoro: The Act of Decorating
The Spanish words “decorarán” (they will decorate) and “decoro” (I decorate) encapsulate the very act of adorning a space, highlighting both the personal initiative and the collective effort often involved in creating beautiful environments. This section delves into the practical and philosophical aspects of engaging with the decorating process.
Planning Your Decorating Project: Vision to Execution
Every successful decorating project, from a simple mantel decor refresh to a full room overhaul, begins with a clear plan.
- Define Your Vision: What mood do you want to create? What colors, styles, and functions are essential? Collect inspiration photos (Pinterest is great for this!).
- Measure and Map: Accurately measure your space, furniture, and any decor items. Sketch out layouts.
- Create a Mood Board: Assemble samples of colors, fabrics, textures, and images of furniture and art to see how they interact.
- Prioritize: Break down large projects into smaller, manageable steps.
- Timeline: Set realistic deadlines for each phase of your project.
Budgeting for Beauty: Smart Decorating Choices
Decorating doesn’t have to break the bank. Smart budgeting ensures you achieve your desired look without overspending.
- Set a Budget: Determine how much you’re willing to spend on each room or project.
- Prioritize Investments: Spend more on key pieces (e.g., a comfortable sofa, quality Floor & Decor tiles) and save on accessories.
- DIY Where Possible: Projects like paint wall with stencils, upcycled furniture, or handmade baby shower decorations can save significant money.
- Shop Smart: Look for sales, thrift store finds, and clearance items. Don’t be afraid to mix high-end and budget-friendly pieces.
- Repurpose What You Have: Before buying new, consider how existing items can be re-imagined or moved to a new location. This aligns with the “organize finances” principles found in sources like Abby Lawson’s blog, applying a methodical approach to spending on decor.
Finding Your Personal Decorating Style
Your style is unique, and decor is an opportunity to express it.
- Explore Inspirations: Look at magazines, design blogs, and showrooms. What consistently catches your eye?
- Identify Core Preferences: Do you gravitate towards modern, traditional, bohemian, minimalist, or eclectic?
- Consider Your Lifestyle: Your decor should be functional and comfortable for how you live.
- Don’t Follow Trends Blindly: While trends offer inspiration, focus on what truly resonates with you and what you’ll love for years to come.
- Experiment: Decorating is an evolving process. Don’t be afraid to try new things and adjust as your tastes develop.
The Joy of a Transformed Space
Ultimately, the act of “decoro” (I decorate) is deeply rewarding.
- Sense of Accomplishment: Seeing your vision come to life brings immense satisfaction.
- Enhanced Well-being: A beautiful and organized space contributes to peace of mind and happiness, creating environments where people can “thrive,” as suggested by some of the research article summaries.
- Expression of Self: Your decor becomes a testament to your creativity and personality.
- Memories: The spaces you decorate become the backdrops for cherished memories, from holiday gatherings with Grinch Christmas decorations to everyday moments of comfort.
FAQs: Your Decorating Questions Answered
How do I choose a cohesive theme for my home decor?
Start by identifying your preferred style (e.g., modern, farmhouse, bohemian) and a core color palette that appeals to you. Look for common elements in inspiration photos you love. You don’t need every room to match perfectly, but consistent elements like a dominant color, wood tone, or metallic finish can tie everything together. Consider the “feeling” you want your home to evoke – calm, vibrant, cozy, or sophisticated – and let that guide your choices across different spaces.
What are budget-friendly ways to update my bathroom wall decor?
Paint is your best friend! A fresh coat of paint in a new color can dramatically change the look. Consider a paint wall with stencils accent. Other ideas include adding affordable framed art, updating your mirror with a new frame or by spray painting an existing one, installing floating shelves for decorative items and storage, or using peel-and-stick wallpaper for a temporary but impactful change. Floor & Decor often has clearance tiles perfect for small accent areas.
When should I start planning my Christmas door decorations?
It’s generally a good idea to start planning your Christmas door decorations (and other holiday decor) in late October to early November. This gives you time to gather materials, craft DIY elements like Grinch Christmas decorations, and install everything without feeling rushed. If you’re ordering custom items or specific garlands, planning even earlier (September/October) is wise to ensure availability and delivery before the holiday rush.
How can I make my graduation cap decoration last?
To ensure your graduation cap decoration lasts, use strong, permanent adhesives like fabric glue or hot glue for any attached elements. For painted designs, apply a clear sealant spray (like Mod Podge Acrylic Sealer) once the paint is completely dry to prevent smudging and offer some water resistance. If you’ve used glitter, a light spray of hairspray can help set it and reduce shedding. Store it carefully after the ceremony, perhaps in a shadow box, to preserve it as a keepsake.
Where can I find design inspiration for Floor & Decor tiles?
Floor & Decor’s website and physical showrooms are excellent places to start. Their website features extensive “Inspiration” galleries categorized by room and style, showcasing various tile and flooring combinations. In-store displays and vignettes allow you to see products in context. Additionally, Pinterest, Instagram (searching #FloorAndDecor), Houzz, and interior design blogs are great resources for seeing how others have used Floor & Decor products in real-world applications, from bathroom wall decor to kitchen floors.
How can I make my holiday decorations more eco-friendly?
To make your holiday decor, including Christmas door decorations and Grinch Christmas decorations, more eco-friendly:
- Reuse: Store and reuse decorations year after year.
- DIY with Natural Materials: Use pinecones, branches, dried oranges, and cranberries for garlands and wreaths.
- LED Lights: Switch to energy-efficient LED Christmas lights.
- Buy Sustainable: Look for decorations made from recycled, reclaimed, or sustainably sourced materials.
- Minimize Waste: Avoid single-use plastics and excessive packaging.
- Potted Plants: Use potted plants (like mini Christmas trees or poinsettias) that can be replanted or reused.
Conclusion: Your Journey to a Beautifully Decorated Life
Decorating is a continuous journey of discovery, creativity, and self-expression. From the everyday comforts provided by thoughtful bathroom wall decor and dining room wall art to the festive joy of baby shower decorations, pumpkin decorating ideas, and whimsical Grinch Christmas decorations, every decor choice contributes to the tapestry of your life. We’ve explored how to personalize your spaces, celebrate life’s milestones, and draw inspiration from diverse sources like Martha Stewart’s timeless yellow kitchen decor, the practical elegance of Floor & Decor tiles, and the limitless potential of a paint wall with stencils project.
Remember that whether you “decoro” (I decorate) with meticulous planning or “decorarán” (they will decorate) with a team, the ultimate goal is to create environments where you and your loved ones can thrive. Embrace the process, experiment with new ideas like Decora DTI projects or unique graduation cap decoration, and allow your spaces to evolve with your story. A beautifully decorated home is not just about aesthetics; it’s about crafting a sanctuary that nurtures your spirit, sparks joy, and truly feels like home. Start transforming your world, one creative idea at a time!